Overview
Zendesk is a cloud-based platform for managing customer support and user interactions.
It helps companies to organize, track and resolve customer queries across multiple channels. Zendesk offers tools to automate processes, build a knowledge base, and provide analytics and reporting. This improves service quality, increases customer satisfaction and optimizes support team workflows.
Once the integration is set up, new reviews in the app stores will start converting to tickets in Zendesk. All the available information about reviews, including review history and tags from Asodesk, will appear in Zendesk.
When your employee responds to a review, it is published on an app store on behalf of the app developer through Asodesk.
Here is a step-by-step instruction on how to set up Asodesk and Zendesk integration:
1. Open Integrations section and click “Connect Zendesk account”
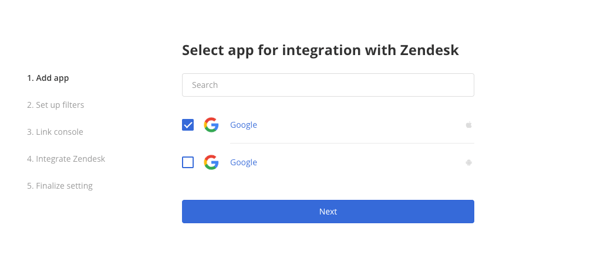
2. Select the apps for which you want to get reviews and reply to them through Zendesk. You can choose several apps if you need to.
3. Set up filters for each app:
-
Filter out reviews that you want to get:
-
all
-
became better (only reviews with the improved rating)
-
became worse (only reviews with the decreased rating)
-
updated (all reviews that were changed)
-
-
Choose how many reviews without developer reply you want to import (up to 100 reviews) or (none)
-
Choose the star rating for the reviews you want to get.
-
Select the countries (for the App Store) and languages (for Google Play) from which you would like to receive reviews.
-
Select the review length you want to get:
-
all
-
less than 3 words
-
or more than 3 words
-
Don't use the review length filter for reviews from Asian countries.
You can also turn off tags if you don't want them to be added to reviews in Zendesk.
If you have selected multiple applications when setting up integration with Zendesk, make sure you set up filters for each of your applications in this step.

4. If you haven't already, connect your App Store Connect or Google Play Console account to all the apps you selected.
You can set up store integrations later after integrating Zendesk.
If you don't link a store console, you'll still get user reviews sent to Zendesk based on the filters you've chosen. But you won't be able to reply to reviews.
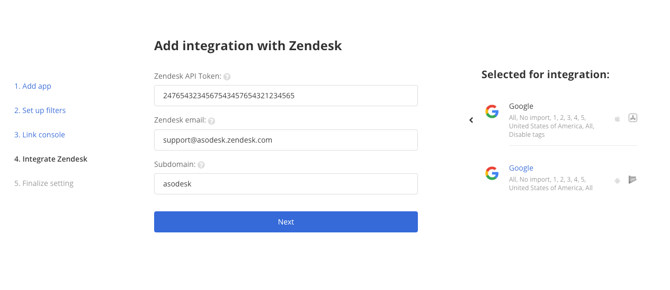
5. Integrate Zendesk. Please add integration with Zendesk for all the apps you have selected:
-
Enter your Zendesk API Token. You can find it in your Zendesk account: Apps and integrations ➡ APIs ➡ API Tokens ➡ Copy existing token or create a new one for this integration.
-png.png?width=670&height=180&name=image%20(4)-png.png)
In the Apps and Integrations ➡ API ➡ API Configuration section, please make sure that the Allow API token access checkbox is selected.
-png-1.png?width=484&height=165&name=image%20(3)-png-1.png)
-
Enter the email address of the Zendesk account (Admin or Agent) that you use to log in to Zendesk.
-
Enter your Zendesk subdomain. You can find it in your Zendesk account: Settings ➡ Account ➡ Branding ➡ Subdomain.
Example:
you see "https://mycompany.zendesk.com". You should paste subdomain without "https://" and without "zendesk.com" - just the "mycompany" part.
6. Finalize settings: in the Asodesk interface, select the group to be assigned to reviews in the Zendesk account.
You can also create new agents and groups in your Zendesk account.
If you don't want templates to be displayed when you reply to reviews in Zendesk, you can disable them.
Your connection with Zendesk is finished!
You can now find your integration settings in the Integrations section. If you want to change it or add any missing information, you can edit the settings by clicking the "Edit" button.
Don't worry if you haven't finished the integration yet. You can go back to it later, and all the changes you've made will still be saved.
Need help understanding our products or services? Have a question? Let us know!
Click the support icon in the bottom right corner or write on hello@asodesk.com